PulLoop | Development of non-contact, process-integrated measurement technology for continuous production processes in the digital production cycle of composites

Development and evaluation of an inexpensive inline measuring system

For continuous production processes such as extrusion or pultrusion, there are currently no cost-effective and integrated inline measuring systems available for monitoring the profile geometry and surface. An objective measuring system would reduce production waste and enable data-driven process development. The commissioning of new profile geometries in particular is fraught with time and financial uncertainty, as empirical values have so far only been available subjectively. Without spatially resolved component monitoring, documentation-intensive industries can only be supplied to a limited extent.

The lack of integration of measurement hardware and software in production systems (closed-loop principle) makes it difficult for small and medium-sized enterprises (SMEs) to use continuous production processes, as cost- and material-efficient installation and operation are not possible.

The aim of PulLoop is to develop an optical measurement system that is significantly more cost-effective than previous measurement systems. In addition, a modular, AI-based evaluation software will be created that enables rapid training and thus supports use in production environments. In addition, a closed-loop approach will be designed, which can only be realized with the new measuring system.
Cost-effective measurement technology thanks to a scaling approach

While existing solutions rely on expensive measurement technology that is only economically viable for a few SMEs due to the high investment costs, PulLoop takes a scaling approach. The necessary measurement technology is comparatively inexpensive (< €3000) and is evaluated by a smart software solution. This means that the investment costs for each individual company remain low and the development costs for the software can be scaled down to all companies.


Challenges in data analysis

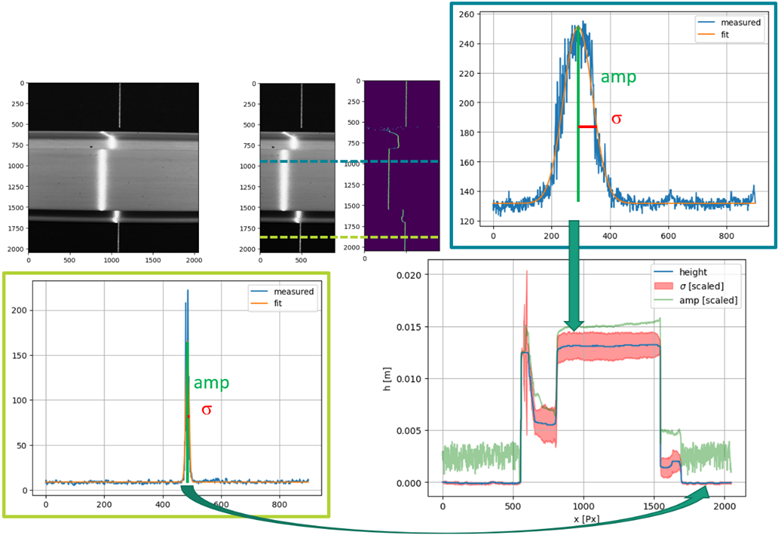
The challenge here is to ensure that the required information content can still be extracted despite the comparatively inexpensive sensor technology. In particular, the challenge lies in the fast and robust evaluation of geometries and errors unknown to the measuring system. Technological approaches of statistical, AI-based analysis technologies are to be expanded. On the one hand, the focus is on developing algorithms for denoising and optimizing images, which can lead to increased robustness of data evaluation. The evaluation routine created for this purpose can be seen in Figure 1.


Schaubild 1 zur Auswerteroutine
© Fraunhofer IWS
Figure 1: evaluation routine

Modular teaching tools for versatile applications

Grafik Modellansicht PulLoop
© Fraunhofer IGCV
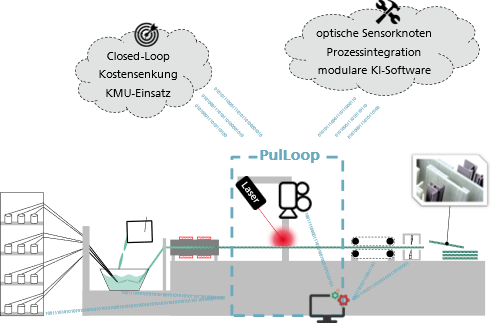
Figure 2: model view PulLoop

On the other hand, new teaching tools are being developed that enable rapid adaptation of the measurement technology in new fields of application (new materials, new defect patterns, changing surface properties). The intended modularity of the measurement technology in software and hardware should increase the use in very different application scenarios and the scaling of the number of possible measuring points to sensor networks. Combining the metrological solutions developed at the IWS with the process expertise at the IGCV creates a unique opportunity to merge the two technologies into a digital manufacturing process. The new technologies will form the basis for the subsequent connection of additional sensor systems through so-called sensor fusion and the feedback control of additional production steps (e.g. laser-based functionalization of surfaces).  This will make it possible to reduce the cost of using modern production technologies in SMEs and increase production efficiency.

Prototype testing and algorithm evaluation

Schaubild 2:  Messung vor Ort an der Pultrusionsanlage des IGCV
© Fraunhofer IGCV
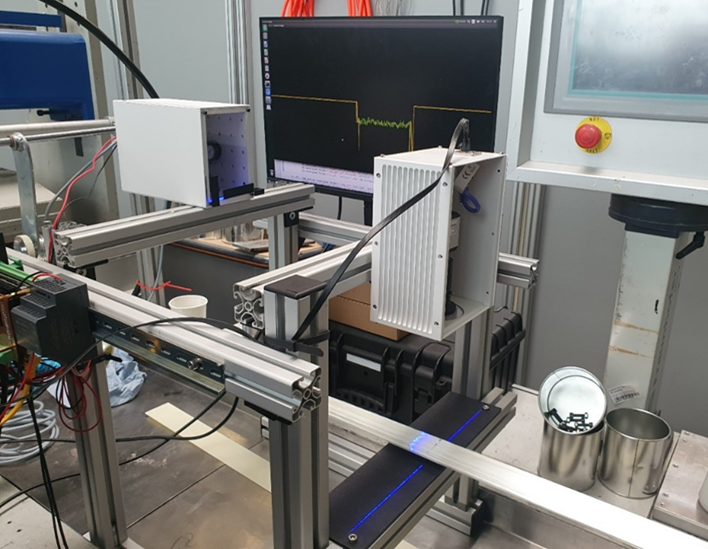
Figure 3: Measurement on site at the IGCV pultrusion plant

For test operation on the pultrusion system, a transportable prototype of the measuring system was built and evaluated at the IWS, the dimensions of which can be adapted to the two pultrusion systems (Pultrex) available at the IGCV (Figure 3).

The test setup was used to evaluate the components and evaluation routines (Figure 1), particularly with regard to the speed of profile extraction with various algorithms. The Gaussian fit, edge filtering and center of gravity calculation algorithms for extracting the laser line were examined, with two algorithms also allowing conclusions to be drawn about the scattering properties of the surface. The runtime analysis showed that edge filtering is the fastest approach and also enables the scattering properties of the surface to be evaluated, which is why it is preferred to the center of gravity calculation.


Successful test series and error analysis

Various test series were carried out on a flat profile, whereby defect patterns were specifically generated by changing the production parameters and by introducing foreign fibers. The tests showed that both defect patterns that change the scattering properties and geometry changes, such as those caused by additional foreign fibers close to the surface, correlate with the data recorded by the measuring system. An example of point defects caused by abrasion is shown in Figure 4. In addition, the influence of disturbance factors that are difficult to simulate, such as changes in the position of the profile when closing the pullers, was examined.


Schaubild 3: Extrahiertes Höhenprofil; extrahierte Streuinformation und Ausschnitt des Livebildes bei der Messung an der Pultrusionsanlage
© Fraunhofer IWS
Figure 4: Extracted height profile; extracted scattering information and section of the live image during measurement on the pultrusion system

Cooperation with Fraunhofer IGCV

Contact us for an individual solution that suits your business needs.

Industry solutions

The key sectors of Fraunhofer IGCV:

  • Mechanical and plant engineering
  • Aerospace
  • Automotive and commercial vehicles

Competences

We are shaping the way into the future of efficient engineering, networked production and intelligent multi-material solutions.