MULTISURV | Methods of process monitoring in multi-material processing

New requirements for process monitoring

The progress achieved in geometry, material, and surface properties has been a key factor in the success of additive manufacturing in recent years. The quality of the generated components has evolved from the fragile view specimen from rapid prototyping times to the finished series part. Among other things, the methods for process monitoring were an enabler for this evolution. With the multi-material processing and the production of mechatronic components envisaged at the MULTIMATERIAL Center Augsburg, a new evolutionary stage of the technology is now about to open up numerous new applications. In addition to existing challenges in mono-material processing, the increase of the materials that can be processed in one process is creating new requirements for process monitoring.

Bavarian Ministry of Economic Affairs, Regional Development and Energy
© StMWi

Powder Bed Monitoring using Active Thermography

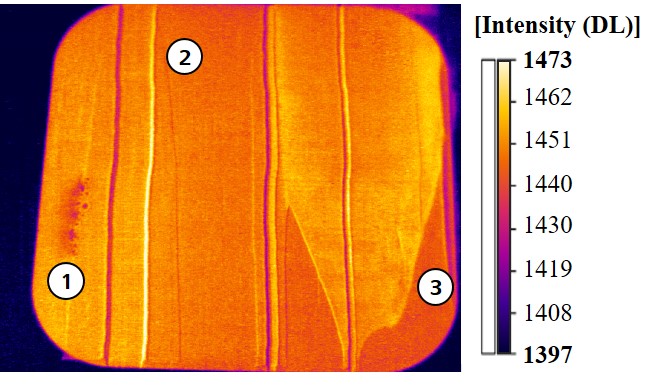
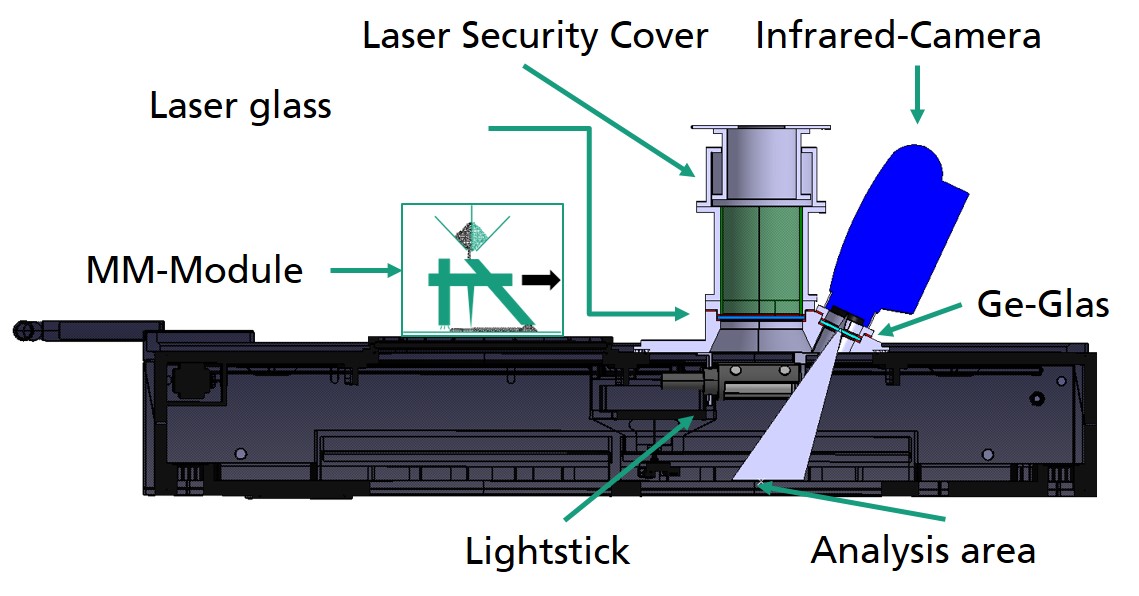
At Fraunhofer IGCV, a developed process step made it possible to produce 3-D multi-material components from copper-chromium-zirconium and tool steel 1.2709. Thus, powder bed monitoring systems must be able to detect the coating defects that already occur during mono-material processing, such as grooves, waves, or insufficient powder supply, and to distinguish materials from one another. Thermography has great potential for this inspection task, as it can distinguish optically similar materials based on their different emission behavior. In the course of the project, a flash lamp for excitation of the powder bed and a thermographic camera were therefore integrated into an AconityOne, to be able to investigate the potential of this technology for this inspection task (see Figure 1). In addition to the detection of classic process deviations, the investigation objects were material differentiation and the detection of layer thickness differences. These are shown as examples in Figure 2.

Integration concept for thermography in AconityOne
© Fraunhofer IGCV
Figure 1: Integration concept for thermography in AconityOne
CuCr1Zr (1) and 100 µm 1.7131 (3) were applied to AlSi10Mg, and grooves in various shapes (2) were added afterwards
© Fraunhofer IGCV
Figure 2: CuCr1Zr (1) and 100 µm 1.7131 (3) were applied to AlSi10Mg, and grooves in various shapes (2) were added afterwards

Quality Control of Solidified Layers by means of Active Thermography

The quality control of additively manufactured (metallic) components still represents a hurdle to faucet into highly regulated industries such as aerospace. Process-related imperfections such as pores, cracks, delaminations, or lack of fusion defects, which can occur even with minor deviations in the process parameters or process conditions, must be reliably detected. Process monitoring technologies used so far usually record the melt bath emissions. However, these only allow limited conclusions to be drawn about the actual component quality. Therefore, this project investigates the extent to which the process laser can serve as an excitation source to detect bonding defects in already solidified layers using active thermography. Figure 3 shows an example of the reaction of artificial discontinuities introduced into test cubes made of 1.4404 to laser excitation. In the further course of the project, it is now necessary to investigate which discontinuity sizes can be detected with this test approach and how this process can be automated.

Thermographic recording of the laser excitation
© Fraunhofer IGCV
Figure 3: Thermographic recording of the laser excitation. Images 1-3: Hotspots in areas of discontinuities 1 and 2. Image 4: Hotspots in areas of discontinuities 2 and 3. Marked in white: Hotspots Marked in green: Approximate component dimensions

Spectroscopic analysis of process emissions

In addition to those already mentioned, the monitoring of the material composition in the components' transition areas also represents a new requirement for the process monitoring of MM processing. To assert this, a spectrometer is being integrated into the process to investigate any emissions that occur. Specifically, the aim is to determine whether the material composition in these transition areas can be used to conclude the functionality of these structures (e.g., insulation effect) and whether material impurities can be detected.

Cooperation with Fraunhofer IGCV

Contact us for an individual solution that suits your business needs.

Industry solutions

The key sectors of Fraunhofer IGCV:

  • Mechanical and plant engineering
  • Aerospace
  • Automotive and commercial vehicles

Competences

We are shaping the way into the future of efficient engineering, networked production and intelligent multi-material solutions.