CondMon3D | Condition Monitoring in Binder Jetting

Monitoring the core component printhead for binder jetting processes

Errors in printed components are expensive and time-consuming (Additive Manufacturing/3D printing). If, for example, the delivery date cannot be met, the overall reputation suffers and the delivery reliability is doubted. In binder jetting, the condition of essential machine components has so far only been checked by hand before the printing process. This is time-consuming and inaccurate. Furthermore, many job crashes cannot be prevented as a result. Consequently, an easy-to-integrate module for binder jetting processes must be developed that enables monitoring to be carried out without significant hardware outlay.

A process room camera inside a 3D printer

The overall objective of the CondMon3D project is to use camera images from a process room camera inside a 3D printer to obtain measurement data for the expected component quality and to be able to readjust them during the process. In this context, the camera represents a simple and cost-effective element that requires little maintenance, is reliable, and does not consume any medium. For this investigation, the camera should be able to image the entire construction field and be retrofitted into existing printing systems.

Setpoint images can be derived from the processing software for the construction process. Various printing strategies are implemented in the printer. There are non-printed areas, areas near the component surface (»skin«), and areas deep inside the component (»core«). The »skin« and »core« areas can each be parameterized. »Core« is set as a percentage of »skin«. This results in gray levels in the »core« area.

Anomaly detection: Detect and evaluate differences

Fault detection using AI: condition monitoring in binder jetting
© Fraunhofer IGCV
Fault detection using AI: condition monitoring in binder jetting

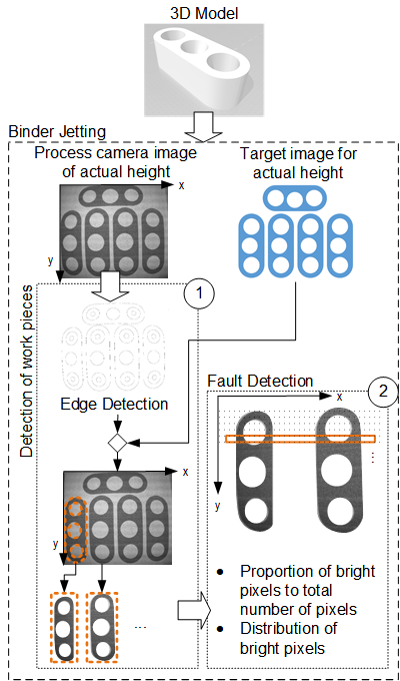
The anomaly detection concept is to compare the nominal value image with the process camera image and mark and evaluate the deviations algorithmically. For this purpose, the image data of the camera image are processed in the first step. The goal of the processing is the shape recognition of the individual cross-sections. These cross-sections are then compared with the cross-sections of the nominal image. If the contour shapes match, the camera image data are distorted to the dimensions of the nominal value image. This provides the basis for comparison by difference formation and characterization of the defect location. The difference image is then spatially additionally filtered to find stripes in the direction of the print head travel (application of domain knowledge). These stripes are compared with other areas that are also intersected by such a stripe. If there is also a defect here, the anomaly found is most likely a nozzle defect. Other defects can also be matched for their cause.

Training of the »Convolutional Neural Network«

Currently, image captures for training the CNN are tagged and optically analyzed. Image pre-processing has been worked out and a camera module has been specified for later implementation. In the following, the target data from the machine will be processed and the CNN trained. In parallel, new data is permanently collected on an industrial 3D printing system.

Cooperation with Fraunhofer IGCV

Contact us for an individual solution that suits your business needs.

Industry solutions

The key sectors of Fraunhofer IGCV:

  • Mechanical and plant engineering
  • Aerospace
  • Automotive and commercial vehicles

Competences

We are shaping the way into the future of efficient engineering, networked production and intelligent multi-material solutions.